Do you have an old kitchen & want to jazz it up at a minimal cost? Budget renovations can be done if you plan them correctly. And they are even better if you can do the work yourself!
Have I got your attention yet? Well if not, how about I tell you that

That’s a much better price than over $10,000 for a new kitchen. So how was it done? Time for a breakdown.
Splashback Tiles –
Sandpaper 60Grit – $3
Coverstain Undercoat – $35
Satin Enamel Paint 1 Litre – $35
(Cloud Cream Bristol)
Walls –
Low Sheen Acrylic Paint 4 Litres – $69
(Sedona Clay Bristol)
Trims –
Same Satin Enamel used as Splashback Tiles
Benchtop –
Penetrol Undercoat 330ml – $25
Satin Enamel Paint 4 Litres – $75 Plenty left over
(Muddled Puddle Bristol)
Cabinetry –
Same Penetrol as Benchtop
Gloss Enamel Paint 4 Litres – $75 Plenty left over
(Almond Bristol)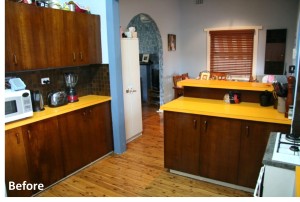
Handles –
Painted in Silver White Knight – $10
Total – $327.00
Splashback Tiles
The original tiles were a Mission Brown square tile that were so dark it make the bench area look like a black hole. It just needed to be lightened overall, so I started with a good clean & a sand. It would be best to use a sturdy, rough sandpaper. The idea is to remove any built up issues on the tiles as well as roughing up the top of the tiles to give better adhesion for the undercoat.
Coverstain is a strong, oil based undercoat that sticks to most finishes, including brushes, rollers & you, so be careful & use drop sheets. Even though you can clean up your utensils with turps, it’s best just to toss them out after Coverstain. One coat of this undercoat will give adhesion ready for the top coats.
Satin Enamel is a top coat finish that can be tinted to most colours. This means you can match the rest of your home’s colour scheme or go bright or bold. This requires two top coats, 24 hours apart to ensure that the paint ha dried properly. Enamel means, wash up with turps, so it is a much more durable & washable finish, but it does smell during painting.
Walls 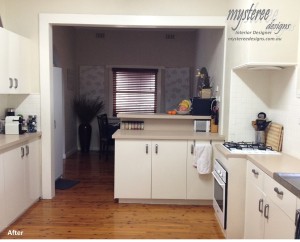
This is a simple case of washing down the walls & two coats of water based paint. Once again this can be tinted to any colour & it is best to leave 24 hours between coats. It washes up in water to make it easier & the smell is much less.
Trims
These just needed a light sand, wipe down & two top coats of satin enamel. I used the same paint as the splashback to keep consistency.
Bench top
The benchtop needed to go! You have to love the 70’s for their flair for colour, however this kitchen needed to ditch the yellow/orange laminate bench top. This was surprisingly easier than I thought. This took a good clean & then a coat of Penetrol. This is clear solution that makes paint stick to other surfaces. This had to be left untouched for 12 hours before the first coat of enamel paint was added. 24 hours later the second coat was added, & 24 hours after that all the items were added back on. This ensured that the paint was properly dried to give the strongest finish.
Cabinetry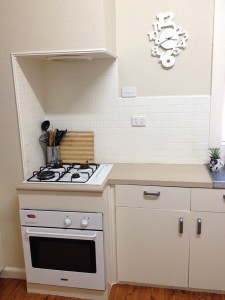
The cabinetry was very similar to the bench top. It took a coat of the Penetrol clear solution & two top coats of the enamel. These cabinets were a stained timber with a clear coat over the top. A good clean & very light sand was all that was required. You can take the doors off the carcass & paint them flat in a shed or garage to keep the smell of the enamel away, however with an old kitchen like this, I chose to leave the doors on while painting which can make it tricky to do the edges. But two coats later, the difference was jaw-dropping.
Handles
To finish off the look, I kept the same plastic handles that originally had a timber look & painted them in a silver finish. This gives the look of the current stainless steel without the price tag of over $10 per handle (with 22 handles that would have blown the budget).
Overall, a massive change for a minimal price
But let’s get to the honest stuff. The pricing list includes the paint, but no accessories. You will need some paint brushes, drop sheets & turps. Luckily no appliances needed to be replaced to allow this renovation to happen. Also the cabinetry carcass may be old, but in good condition so there was no need for a new base cabinet.
The painted finish on the splashback, benchtop & cabinetry is an enamel. This is a durable finish but it can be scratched, chipped or scuffed with rough handling. There has only been one little chip in the benchtop paint since completion due to an oven pot being dropped on it. This was an easy touch up fix with a dab of the enamel paint in that spot, & wait 24 hours for that spot to dry. Painting these finishes will give the ‘make-over’ you want, however the shelf life of the finish depends on use. For a moderately careless cook, like myself, the kitchen may have a few scratches in two or so years. So consider the painted make-over as a stop gap measure to eventually overhauling the entire kitchen cabinetry.
But trust me, you can make a huge & workable difference with only a few hundred dollars & some elbow grease… if you’re up for it! Or maybe you’re lucky & just need to tackle one section of the kitchen. Either way, it just takes a couple of simple steps & you could have a fresh new look in just a weekend!
Get all the information you need with these free Interior Design posts –
What First Impressions is Your Business Making? – https://www.mystereedesigns.com.au/what-first-impressions-is-your-business-making/
DIY Renovating – https://www.mystereedesigns.com.au/diy-renovating/
Current Interior Design Colour Trends – https://www.mystereedesigns.com.au/current-colour-trends-grey/
What is Contemporary Design ? – https://www.mystereedesigns.com.au/what-is-contemporary-design/
How to get the Most out of your Interior Designer – https://www.mystereedesigns.com.au/5-tips-to-get-the-most-out-of-your-interior-designer/
Proportion Design Principles – https://www.mystereedesigns.com.au/design-principles-my-favourite-proportion/
Do you get stuck with colours? Click here for Colour Advice.
You can also find me on my socials for the latest projects –https://www.facebook.com/MystereeDesigns https://www.instagram.com/mysteree_designs/